Set Up Csv Feed With Shopify
How to export your data from Shopify and import it into Plytix
This guide exists because you cannot export a CSV template from Shopify that will be automatically consumed by the Plytix importer. Plytix requires one row per product, while Shopify exports multiple rows of data per product. When bringing your product content from Shopify into Plytix for the first time there are a few best practices to follow. In this article we'll explain the easiest way to export your data from Shopify into Plytix.
Before you start
Exporting from Shopify
Importing into Plytix
Before you start
You need a few things before you get started with this guide:
- Access to your Shopify admin panel
- A Plytix account
- The Matrixify app
- An understanding of the differences between identifying products in Plytix and Shopify
ℹ️ Matrixify is a paid product not included in your Plytix plan. Plytix is not affiliated with Matrixify. We recommend this app because it is the best one we have found to export data and import it into Plytix with no data loss and little manual work involved. If you know of any others, please let us know :)
Products and Variations in Plytix vs Shopify
In Shopify, all products are identified by a "Handle".This field tells Shopify, essentially, how to group products together. Variants of a product will have the same "Handle" and "ID" as the parent product but will have different "Variant SKU"and option values.
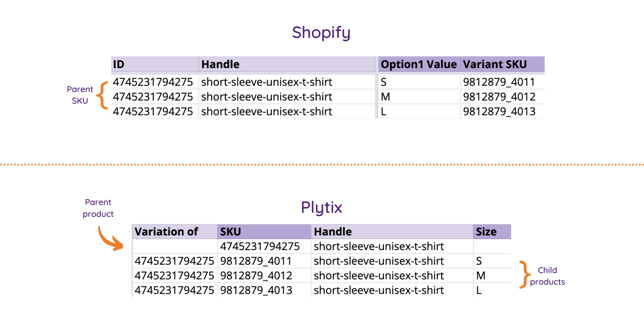
In Plytix, the "SKU" is the unique identifier of all products. Variants of a product all have different SKUs and are linked to a "parent" product, or what is sometimes called a "non-sellable" product. Plytix identifies variations by identifying the parent SKU in a system attribute called "Variation of".
This difference is how variations are managed also results in a difference in how attributes and assets are assigned in the CSV. Therefore, we need to use a third-party app to help us bridge the gap between the two.
ℹ️ The key difference between Plytix and Shopify is how variants are exported into a CSV file.
Exporting from Shopify
To get products from Shopify to Plytix, you need to first export your products and content from Shopify. There are two main ways of doing this:
- Exporting directly from Shopify
- Exporting using the Matrixify App
We recommend using Matrixify to export your products. Matrixify lets you export the Shopify ID along with the rest of your data. This makes it easier to import products and variants into Plytix. This also ensures every row on the file has an identifier which keeps you from losing data on import.
⚠️ Exporting directly from Shopify requires manual manipulation and clean up and may result in loss of data.
To export your product data from Shopify using Matrixify:
- Head to the "Apps" section of your Shopify account.
- Enter the "Matrixify" app
- Select "New export"
- Select the export format "CSV"
- Select the items you want to include in your export (products and columns).
- Click "Export".
- Download your exported file.
Importing into Plytix
Now that you have your product data from Shopify, it's time to import it into Plytix.
Getting all your data in requires importing the spreadsheet twice.The first import will serve to create "non-sellable parent products" and all the generic product information of these products in Plytix.
In the second import, you will get all the variations of the non-sellable parent product and the variation information into Plytix.
First import
As mentioned before, this first import will serve to set up the parent product in Plytix. To do this, follow the steps to import a CSV. In this import match columns with generic data, since it will apply to parent products, and images.
- During the data matching process, find the column "Shopify ID" and match it to the system attribute "SKU". This will create the "Parent" products.
- Match or create new attributes for the columns with generic product information.
- Set new values for media attributes to "Add." This will keep you from losing the images of product variations.
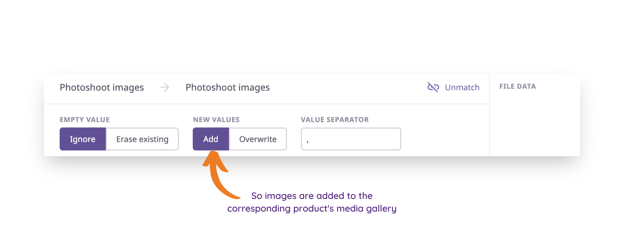
ℹ️ If a variant product has multiple images, these images will be linked to the parent product. You will need to manually link these images to the variations.
Second import
The second import will create the product variations in Plytix. During this import:
- Look for the column "Variant SKU" and match it to the system attribute "SKU".
- This time, match the column "Shopify ID" to the system attribute "Variation of".
- Match your other columns that contain information relating to variations.
After concluding the second import, all columns that contain product information you want in Plytix should have been matched and imported.
All your information will now be in Plytix.
What's next?
- Learn how to create and manage a Shopify channel
- Learn more about importing product data into Plytix
- Learn how to upload assets to Plytix
And remember, if you run into any trouble or have any questions, do not hesitate to contact your customer success manager by email or click on the chat box on the bottom right of this page….
And please let us know 👇
Source: https://help.plytix.com/en/shopify-import
Belum ada Komentar untuk "Set Up Csv Feed With Shopify"
Posting Komentar